
If you’ve ever tried to make Chicken Parmesan at home and ended up with a plateful of chicken where half the breading stayed in the pan, you’re not alone. It’s one of those frustrating cooking challenges that can leave you scratching your head and reaching for takeout menus. But don’t worry, we’re here to save your dinner plans! In this guide, I’ll walk you through everything you need to know to get that golden, crispy breading to stick like glue to your chicken Parmesan.
Introduction to Chicken Parmesan and the Importance of Perfect Breading
Let’s face it—Chicken Parmesan is a crowd-pleaser. Whether you’re cooking for a dinner party or just craving comfort food, there’s nothing quite like biting into a crispy, breaded chicken cutlet topped with marinara sauce and gooey melted cheese. But what makes or breaks this dish? You guessed it—the breading. Understanding how to get breading to stick to chicken parmesan is the secret to nailing this classic dish.
Perfect breading transforms a plain piece of chicken into a crispy, flavorful masterpiece. But when it falls off, it ruins the experience. Figuring out how to get breading to stick to chicken parmesan consistently can save you from disappointment and elevate your dish to restaurant quality.
For inspiration, explore this Olive Garden Chicken Parmigiana recipe to learn how classic flavors can shine through in Chicken Parmesan
Table of contents
Common Problems with How to Get Breading to Stick to Chicken Parmesan
Getting breading to stick sounds simple, right? Dip, dredge, fry, and voilà! But in reality, a lot can go wrong. Let’s explore why you might struggle with how to get breading to stick to chicken parmesan and how to fix it.
Why Does Breading Fall Off When Cooking Chicken Parmesan?
Picture this: you’ve spent 20 minutes carefully breading your chicken. You drop it in the pan, and seconds later, the breading peels off. If you’re frustrated, you’re not alone—it’s a common issue when learning how to get breading to stick to chicken parmesan. Often, the culprit is moisture. Too much moisture on the chicken’s surface prevents the layers from adhering properly.
If you’re curious about creative ways to use Parmesan, check out this Garlic Parmesan Chicken Pasta recipe for another take on the classic flavor.
Key Preparation Mistakes That Impact Breading on Chicken Parmesan
If you skip key steps in the breading process, you might never figure out how to get breading to stick to chicken parmesan. Skipping the flour layer, rushing through egg coating, or using uneven breadcrumbs can all lead to breading failure. Think of each step as a building block—missing one weakens the entire structure.
Choosing the Wrong Ingredients for Chicken Parmesan Breading
Using the wrong ingredients also impacts how to get breading to stick to chicken parmesan. Finely ground breadcrumbs don’t provide enough grip, and a runny egg mixture won’t act as an effective adhesive. Choosing the right components is essential to achieving a perfect result.
The Science Behind Perfect Breading Adhesion
Before we get into the step-by-step process, let’s nerd out a bit and talk about the science behind breading adhesion. Understanding this can be a game-changer for your kitchen adventures.
The Role of Protein and Egg Coating
Eggs are the unsung heroes of breading. When beaten, they create a protein-rich layer that acts like double-sided tape. This layer grabs onto the flour beneath it and holds the breadcrumbs above it, creating that perfect crispy coating.
How Breadcrumb Texture Affects Stickiness
Ever notice how restaurant Chicken Parmesan always seems to have the perfect crunch? That’s because chefs often use Panko breadcrumbs. These Japanese-style breadcrumbs are larger and flakier than regular breadcrumbs, giving you a crispier texture. Plus, their uneven surface grips the egg layer better, which means less sliding around.
Essential Ingredients for Perfect Chicken Parmesan Breading
Now that we know the “why,” let’s focus on the “what.” Using the right ingredients can make or break your breeding success.
| Ingredient | Why It Matters |
|---|---|
| Chicken Cutlets | Evenly sized pieces cook more uniformly. |
| Flour | Creates the base layer for breading. |
| Eggs | Acts as the adhesive for the breadcrumbs. |
| Breadcrumbs (Panko) | Adds crunch and texture. |
| Seasonings (Salt, Pepper, Parmesan) | Boosts flavor. |
Types of Chicken Cuts and Their Impact
Let’s talk chicken. Using the wrong cut can mess up your breading game. Thinly sliced chicken breasts work best because they cook quickly and evenly. Thick pieces might cook unevenly, leaving you with burnt breading and undercooked meat.
Choosing the Right Breadcrumbs: Panko vs. Traditional
Not all breadcrumbs are created equal. If you want that restaurant-quality crunch, go for Panko. Traditional breadcrumbs are finer and create a smoother texture, which isn’t ideal for Chicken Parmesan.
Chef’s Tip: “Mix a little grated Parmesan cheese into your breadcrumbs for extra flavor. It’s like giving your breading a cheesy hug.” 🧀
The Role of Flour in the Breading Process
Flour is the unsung hero of breading. Think of it as the foundation of a house—it’s not flashy, but everything else depends on it. The flour helps absorb moisture from the chicken and gives the egg something to cling to.
Step-by-Step Process for Getting Breading to Stick
We’ll cover this in more detail in Part 2, but here’s a sneak peek at the process:
- Pat the chicken dry.
- Coat it lightly in flour.
- Dip it in an egg mixture.
- Press it into breadcrumbs.
- Let it rest before cooking.
- Let the Breading Set Before Cooking
Now that we’ve covered the basics, it’s time to roll up your sleeves and get to the good stuff: how to bread chicken like a pro. Follow these steps carefully, and you’ll end up with perfectly breaded Chicken Parmesan every time.
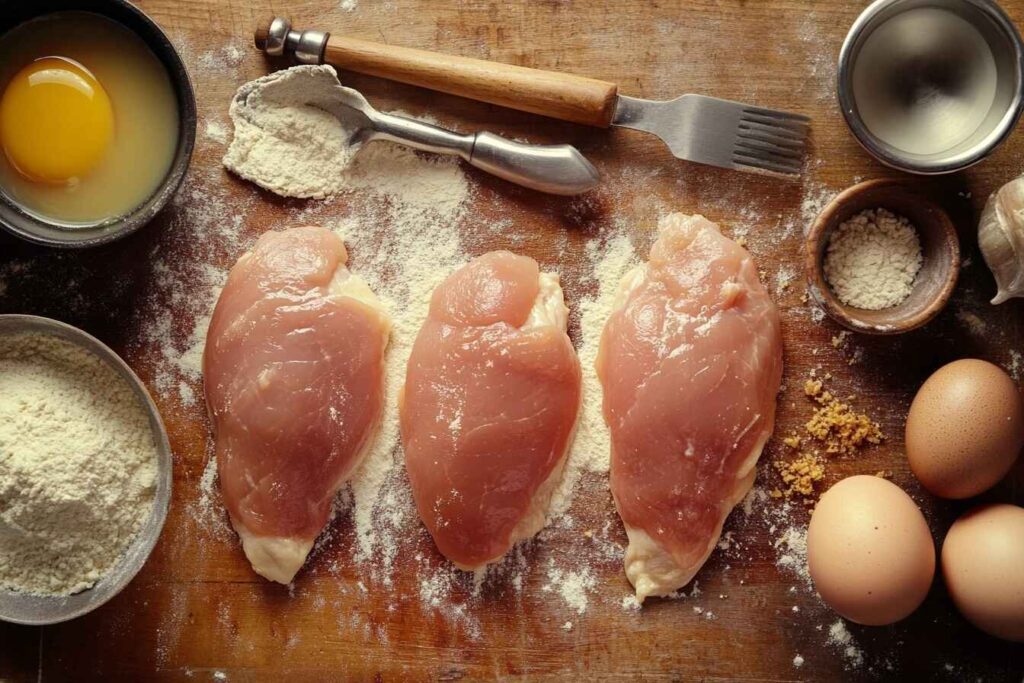
Step 1: Preparing the Chicken Properly
First things first, start with high-quality chicken. Trim off any excess fat or gristle, and pound the chicken breasts to an even thickness. This ensures they cook uniformly, so you don’t end up with raw spots or overcooked edges.
Quick Tip: “If you don’t have a meat mallet, use a rolling pin or the bottom of a heavy skillet to pound the chicken.” 🥩
Step 2: The Importance of Drying the Chicken
This step is non-negotiable. Pat the chicken dry with paper towels. Any moisture on the surface will prevent the breading from sticking and can make the chicken steam rather than fry. Trust me, soggy breading is nobody’s favorite.
Step 3: The Role of a Flour Coating
Here’s where the magic begins. Lightly dredge each chicken piece in flour, making sure it’s evenly coated. Shake off any excess flour to avoid clumps.
Why is this step so crucial? The flour acts as the first layer of glue, giving the egg something to hold onto. Think of it as laying down the primer before you paint.
Step 4: Creating the Perfect Egg Mixture
Next up, whisk together eggs in a shallow bowl. Add a splash of milk or water to loosen the mixture slightly, making it easier to coat the chicken evenly. For added flavor, throw in a pinch of salt and pepper.
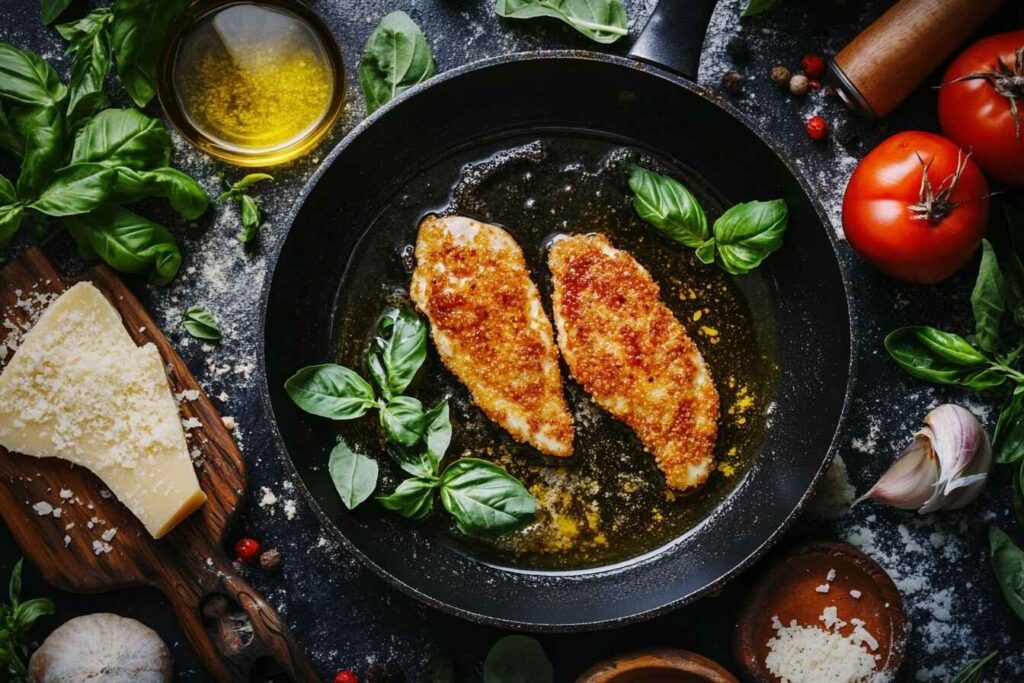
Step 5: Pressing Breadcrumbs Firmly
Ah, the breadcrumb layer—the pièce de résistance! Press the floured, egg-dipped chicken into a plate of breadcrumbs. Make sure to use Panko breadcrumbs for maximum crunch. For a flavor boost, mix in grated Parmesan cheese, Italian seasoning, or even a dash of garlic powder.
Pro Tip: “Use one hand for wet ingredients (egg) and the other for dry (breadcrumbs) to avoid creating a sticky mess.”
Step 6: Let the Breading Set Before Cooking
Here’s a step most people skip: letting the breaded chicken rest for 10–15 minutes before cooking. This gives the layers time to bond, which helps prevent the breading from sliding off during frying.
Block Quote: “Patience pays off. Letting the breading set is like letting glue dry—it makes all the difference!” ⏳
Cooking Techniques That Preserve the Breading
Now that your chicken is perfectly breaded let’s talk about how to cook it without ruining all your hard work. The cooking method you choose can make or break your Chicken Parmesan.
The Best Oils and Heat Levels for Frying
If you’re frying, choose an oil with a high smoke point, like vegetable, canola, or peanut oil. Heat the oil in a skillet over medium-high heat until it shimmers. You want it hot enough to sizzle but not so hot that it burns the breading before the chicken cooks through.
Chef’s Tip: “Test the oil by dropping in a small breadcrumb. If it sizzles and turns golden in a few seconds, you’re good to go.” 🍳
Alternatives to Frying: Baking and Air Frying Tips
Not a fan of frying? No problem! You can bake or air fry your Chicken Parmesan and still achieve a crispy coating.
Baking:
- Preheat your oven to 400°F (200°C).
- Place the breaded chicken on a wire rack set over a baking sheet to ensure even airflow.
- Bake for 20–25 minutes, flipping halfway through.
Air Frying:
- Preheat your air fryer to 375°F (190°C).
- Spray the breaded chicken with cooking spray to help it crisp up.
- Air fry for 12–15 minutes, flipping halfway through.
Block Quote: “Air frying is a game-changer. It gives you that fried crunch with way less oil—your arteries will thank you!” 🥳
Troubleshooting Common Breading Problems
Even with the best intentions, things can still go sideways. Here’s how to troubleshoot some common issues.
What to Do if Breading Starts Falling Off During Cooking
If your breading starts to peel away in the pan, don’t panic. It might be because the oil wasn’t hot enough when you started frying. Remember, hot oil seals the breading and keeps it in place.
Quick Fix:
- Gently press the loose breading back onto the chicken with a spatula.
- Avoid flipping the chicken too often—once per side is enough.
How to Avoid Soggy or Uneven Breading
Soggy breading can happen if you overcrowd the pan, causing the chicken to steam instead of fry. Uneven breading usually means you didn’t press the breadcrumbs firmly enough.
Pro Tips:
- Cook in batches if needed. Give each piece of chicken plenty of space.
- Use your hands to press the breadcrumbs firmly into the chicken before letting it rest.
Pro Tips for Achieving Restaurant-Quality Chicken Parmesan
Want to impress your guests (or just yourself)? Here are a few tricks to take your Chicken Parmesan to the next level.
Incorporating Parmesan Cheese in the Breading
Mixing grated Parmesan into the breadcrumbs adds a nutty, cheesy flavour that elevates the dish. Just make sure the cheese is finely grated so it doesn’t clump.
Adding Herbs and Spices for Flavor Enhancement
Think outside the shaker! Add dried basil, oregano, or even a pinch of red pepper flakes to your breadcrumb mixture for an extra kick of flavour.
Final Touch: Serving Suggestions
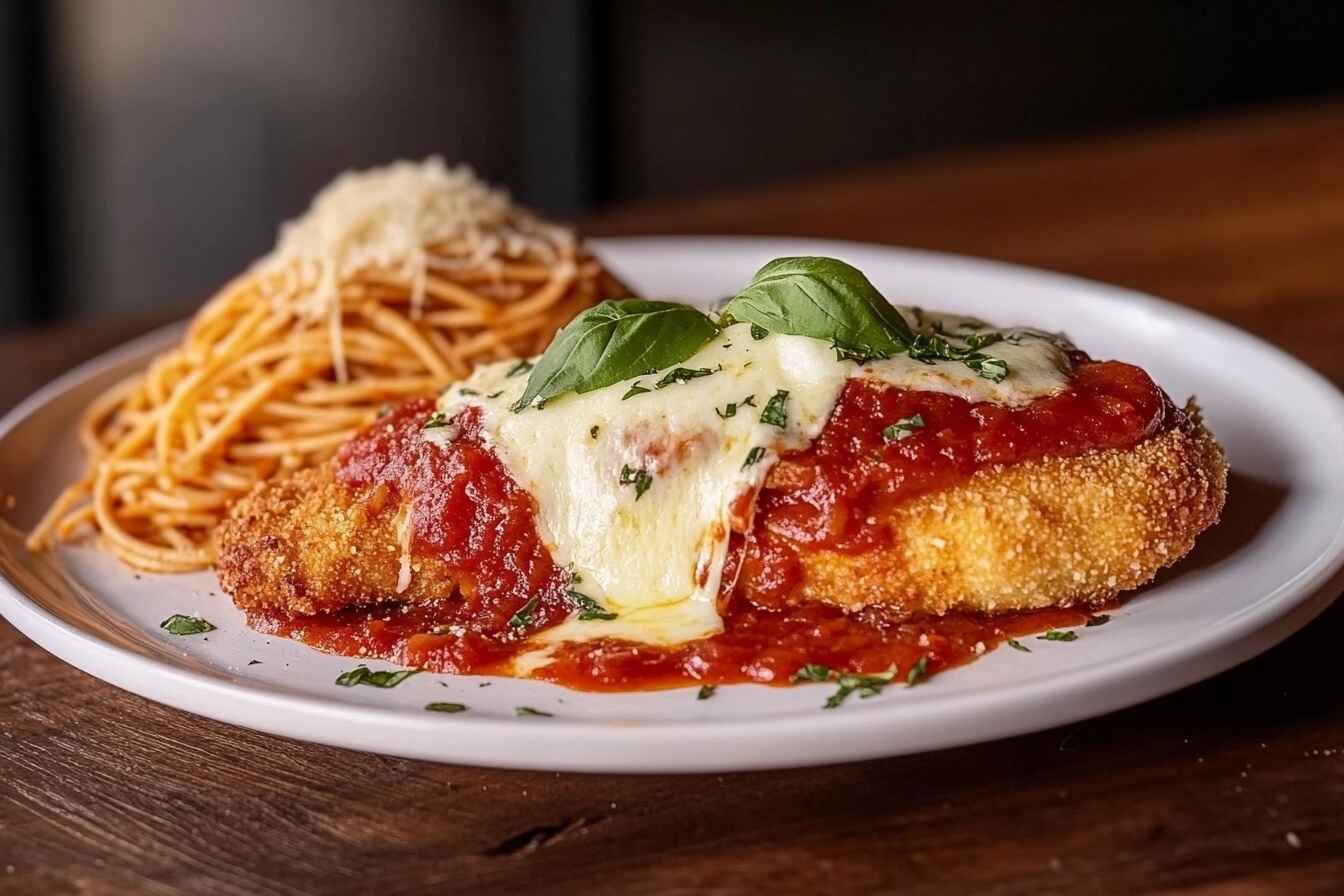
Once your Chicken Parmesan is cooked to perfection, top it with marinara sauce and mozzarella cheese, then pop it under the broiler for a minute or two. Serve it over spaghetti or with a side of garlic bread, and you’ve got yourself a feast.
Table: Nutrition Facts (Per Serving)
Nutrient Amount Calories 450 Protein 30g Carbohydrates 25g Fat 18g Sodium 600mg
Frequently Asked Questions About Breading Chicken Parmesan
Even with all the tips and tricks we’ve covered so far, you might still have a few lingering questions. Don’t worry—I’ve got answers to some of the most common queries about breading Chicken Parmesan.
Can I Make Chicken Parmesan Gluten-Free?
Absolutely! Gluten-free Chicken Parmesan is easy to make. Simply swap out the regular flour and breadcrumbs for gluten-free alternatives. Many grocery stores now carry gluten-free Panko breadcrumbs, which work just as well for that crispy coating. For the flour, use rice flour, almond flour, or any gluten-free blend.
Pro Tip: “For an extra crunch in gluten-free breading, try crushed rice cereal as a substitute for breadcrumbs.” 🌾
How Do I Store and Reheat Breaded Chicken?
If you’ve made a big batch of Chicken Parmesan and have leftovers (lucky you!), storing and reheating it properly is key to maintaining its deliciousness.
Storage:
- Let the chicken cool completely before storing.
- Place the chicken in an airtight container and refrigerate for up to 3 days.
Reheating:
- Preheat your oven to 375°F (190°C).
- Place the chicken on a wire rack over a baking sheet to keep it crispy.
- Heat for 10–15 minutes or until warmed through.
Chef’s Warning: “Avoid microwaving breaded chicken unless you like soggy, limp breading. The oven is your best friend here.” 🍗
Can I Prepare Chicken Parmesan Ahead of Time?
Yes, you can! In fact, prepping ahead can make your cooking process much smoother, especially if you’re hosting a dinner party.
How to Prep Ahead:
- Bread the chicken up to 24 hours in advance.
- Lay the breaded chicken on a baking sheet lined with parchment paper and cover it with plastic wrap.
- Store it in the refrigerator until you’re ready to cook.
When it’s time to cook, proceed with frying, baking, or air frying as usual. The breading will still stick perfectly.
Advanced Tips for Perfect Chicken Parmesan
Once you’ve mastered the basics, it’s time to level up your Chicken Parmesan game with some advanced techniques.
Double Breading for Extra Crunch
If you’re craving an extra-crispy coating, try double-breading your chicken. After the first round of flour, egg, and breadcrumbs, repeat the process: another dip in the egg and another coat of breadcrumbs.
Block Quote: “Double breading is like putting on a winter coat—it gives your chicken an extra layer of crispy goodness!” ❄️
Using Fresh Breadcrumbs
While store-bought Panko breadcrumbs are fantastic, you can take things up a notch by making your own. Blend slightly stale bread in a food processor until coarse. Toast the crumbs in the oven for extra crunch.
Experimenting with Sauces and Toppings
Who says you have to stick with marinara sauce and mozzarella? Switch things up with a spicy arrabbiata sauce, or use a mix of cheeses like fontina, provolone, and Parmesan for a unique flavour twist. You could even try adding a layer of sautéed mushrooms or spinach for a gourmet touch.
Pairing Chicken Parmesan with the Perfect Sides
No great dish is complete without its trusty sidekicks. Here are some popular pairings for Chicken Parmesan:
- Pasta: Spaghetti with marinara sauce is a classic choice.
- Garlic Bread: Because carbs and cheese are a match made in heaven.
- Salad: A fresh Caesar salad can balance the richness of the dish.
- Roasted Veggies: Broccoli or asparagus adds a healthy touch.
Troubleshooting Summary: Quick Fixes for Common Issues
To make sure your breading game stays strong, here’s a quick summary of solutions for common problems:
| Problem | Solution |
|---|---|
| Breading falls off | Pat chicken dry, use proper breading technique, let rest. |
| Soggy breading | Avoid overcrowding the pan, cook at the right temperature. |
| Uneven breading | Press breadcrumbs firmly, ensure even flour coating. |
| Overcooked breading, raw chicken | Use evenly pounded chicken and the correct heat. |
Conclusion:
Mastering the Art of Perfect Chicken Parmesan Breading
And there you have it—a complete guide to getting breading to stick to Chicken Parmesan like a pro. Whether you’re a beginner or a seasoned cook, these tips and techniques will help you create a dish that’s worthy of a standing ovation (or at least a very satisfied smile).
So, next time you’re in the kitchen, don’t let your breading betray you. Follow these steps, experiment with flavors, and have fun! Cooking should be as enjoyable as eating, after all.
Final Words: “Mastering Chicken Parmesan isn’t just about the breading—it’s about the love and care you put into every step. And hey, even if it’s not perfect, it’s still chicken and cheese—how bad can it be?” 😄
Now grab your ingredients, and let’s make some crispy, cheesy magic happen! 🍴